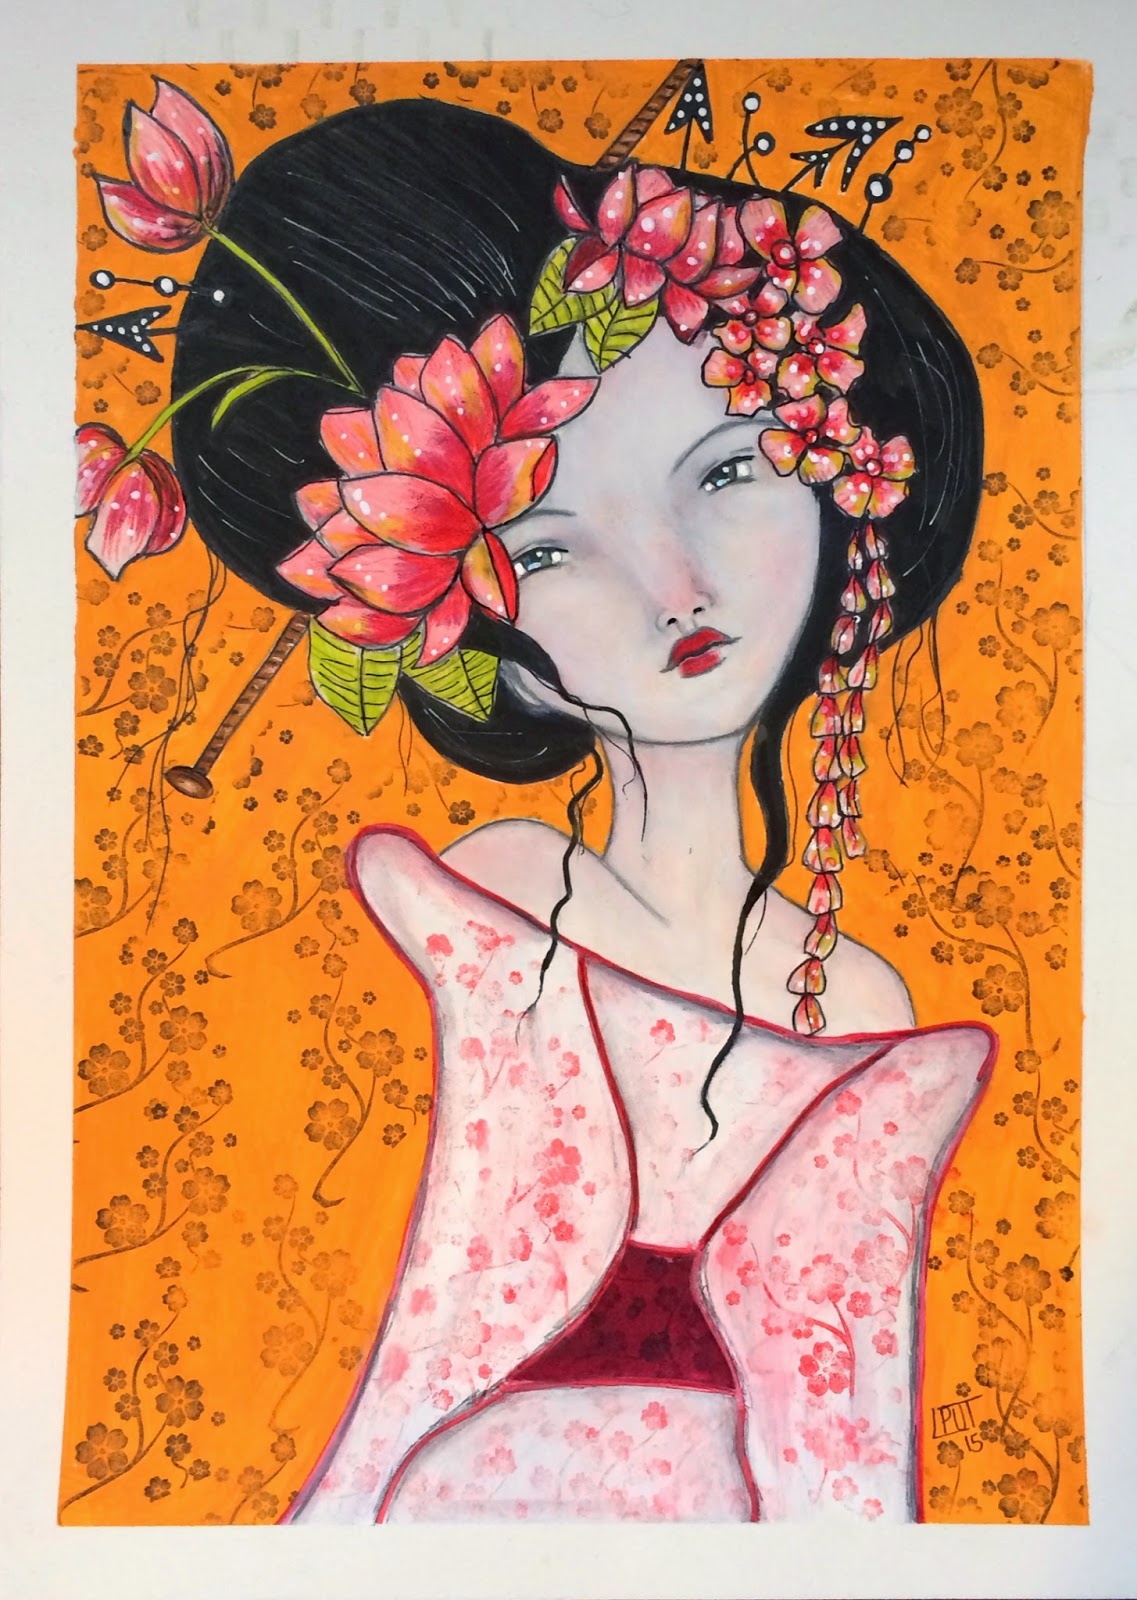
Spent some time working on a new creepy cutie. I have named her Olivia. I used Neo Colors, color pencils, acrylic paint pens and ink to create her. Then I cut her out and worked on the background. Spray inks, stencils, acrylic, paint pens and water soluble oil pastels were used to create the background. Once I was finished with the background I glued her own then added melted wax to add texture and shine.
She will now join the other Creepy Cuties before her.
Sunday, October 23, 2016
Friday, September 30, 2016
Fall photo shoot
This past Monday I spent the afternoon with a great friend snapping photos, enjoying lunch and great conversation. It's so nice to spend time with a creative friend. Cindy loves to take photos and I think is pretty darn good at it. check her out on instagram. cindypowersphotography.
Here are some of my favorite shots I took that day. I did a little playing around with them in photoshop as well. It was a fun change of creative expression. I don't usually take many photos unless its at my sons soccer game. It was fun looking into the world through a lens.
Night Watch.
Spent some much needed time in my studio last weekend. Have a few more pieces that I am working on and I am hoping that I can get back into the studio this weekend to work on them.
I am calling this "Night Watch". My son Jackson named her Julia and she is protects us from things that go bump in the night. I guess the Halloween spirit is getting to me a few weeks early.
Hope you all enjoy.
I am calling this "Night Watch". My son Jackson named her Julia and she is protects us from things that go bump in the night. I guess the Halloween spirit is getting to me a few weeks early.
Hope you all enjoy.
Saturday, August 22, 2015
Some inspiration from Trash Polka style tattoos
Just finished watching last weeks Ink Master and the style they focused on was called Trash Polka. I loved the composition and the how the red popped in the tattoo artist artwork and It inspired me to create one of my Geisha Girls in this style. Defiantly going to do some more creating this way.
Materials used:
Water color paper
Pencil
Ink
Posca Pens
Water color
Rub on's
Stencils
Thursday, July 23, 2015
Geisha girl complete (forgotten photo)
I didn't realize I never posted the finished photo of this Geisha Girl. Sadly I haven't been able to draw much lately since I started my new job. I miss it terribly but just haven't had the time. When I do have the time I have no inspiration. I am hoping soon I will be back to drawing. Until then here is my last Geisha Girl completed.
Sunday, January 18, 2015
Geisha Girl #3 complete
Another lovely Sunday spent in the studio. Finished up Geisha Girl #3. She was created on water color paper using acrylics, Neo Color II, Gelato's, Big Pitt Pen, Prisma Pencils, Posca Pens, Stamps and Ink. I used a decorative tissue paper for the dress. Just like always everything but the kitchen sink!
Hope you like the newest addition.
L
Hope you like the newest addition.
L
Friday, January 9, 2015
Geisha Girl #2 Complete
Just finished up 2 of 4 of my new girls. She looks like the younger sister to the first one.
To create her I used Neo color II, Gelatos, Prisma pencils, Pitt pen (for the hair), acrylics, white Sharpie marker, Posca pens, inks, stamps and Dylusions spray ink. Umm I think that's it! Ha. I really do love my art supplies. Hope you enjoy what I have created.
Lesa
To create her I used Neo color II, Gelatos, Prisma pencils, Pitt pen (for the hair), acrylics, white Sharpie marker, Posca pens, inks, stamps and Dylusions spray ink. Umm I think that's it! Ha. I really do love my art supplies. Hope you enjoy what I have created.
Lesa
Monday, January 5, 2015
Starting out 2015 Geisha style
As 2014 was winding down I found no time to create which doesn't make for a very happy girl. Thank goodness for time off! It gave me a chance to start creating again.
Exploring the internet mostly Pinterest (totally addicting!) I found some photos of Geisha's and knew I had to create some of my girls Geisha style. I drew up 4 girls to start my new series and I am so excited to bring them to life with color!
Here is one of my sketches.
Exploring the internet mostly Pinterest (totally addicting!) I found some photos of Geisha's and knew I had to create some of my girls Geisha style. I drew up 4 girls to start my new series and I am so excited to bring them to life with color!
Here is one of my sketches.
I started adding color to the last girl I drew. I used a big pitt pen for her hair and Neo II colors, Gelatos and Golden's Titanium White acrylic paint for her skin.
I started coloring in the flowers with neon Montana markers but didn't like how it looked.
So like I tell the kids I teach, it's not a mistake just another direction, I covered it up and went a total different way with the flowers.
Using a white Sharpie paint pen I drew in the flowers. I love the contrast of the white outlines on the black hair. I used Washi tape to create her dress. The background was colored in with acrylic and stamped with flowers and butterflies.
On to the next Geisha Girl. Here is her #WIP.
Thanks for stopping by to check out what I have been up to. I hope to be posting more often now that the holiday's are over.
Happy 2015! May you have many happy days to create!
xo
Sunday, November 2, 2014
Tweedle Dee Tweedle Dum
Slowly but surely I have been making progress with my latest piece. In keeping with the theme of Alice in Wonderland I created the twins.
I first started by drawing my girl in my sketch book.
Here is the finished version of my girls. I love the brightly colored hair with the contrast of the yellow background and black and white stripped shirts.
I first started by drawing my girl in my sketch book.
Then I transferred my girl onto a piece of masonite board using carbon paper then traced her with tracing paper so that I had a flipped version of her to transfer to the other side. A mirror image of the girl!
Next, I started painting their faces and body. I used water color crayons, Titian Buff Golden acrylics, neon red Golden acrylics , pencil, Montana Markers in neon and large Pitt Pens in black and white.
I used a stencil and Golden Glass Bead Gel and a stencil for texture on their dresses and some on the background. Next yellow acrylic paint was used on the background.
Its hard to see but I used a stamp and ink pad in black for the background but then lightly painted over it so setting it into the background. I applied the arrow stencil with orange acrylic paint in the background as well. I used some grafite on the dress to cast shadows and dirty it up then I added bows and a pearl flat sticky back bead as well as a crystal on top of their propellers for the finishing touch.Here is the finished version of my girls. I love the brightly colored hair with the contrast of the yellow background and black and white stripped shirts.
Terminator costume..... I'll be back
For Halloween this year my son wanted to dress up as the Terminator. Yes, my 9 year old loves Terminator movies thanks to my husband introducing them to him.
So I went on a search through Pinterest and Youtube to figure out how to make this costume come alive. There are some really great "how to create a cyborg costume" on youtube that helped me figure out what I wanted to do. I bought some face paint, fake blood and grabbed my tacky glue and went to work.
I ordered a cyborg prosthetic from amazon that said it was kid size but it was more like adult so I cut it down to size and used sprit gum to adhere it to his face. Then I used Tacky Glue around the edges to seal it and to make it look like torn skin. On his hand I used the tacky glue to outline the opening and then used grey, black and white face paint to create the inside of the hand. I did the same thing on the other side of his face. Then I dabbed fake blood all around the glue.
For the finishing touches I took a pair of 80's style sunglasses and a red finger laser light and attached the laser light to the side of the glasses with sticky back velcro. I found a jacket in his size on amazon and bought a toy shot gun. A little spike of the hair and we were done!
So I went on a search through Pinterest and Youtube to figure out how to make this costume come alive. There are some really great "how to create a cyborg costume" on youtube that helped me figure out what I wanted to do. I bought some face paint, fake blood and grabbed my tacky glue and went to work.
I ordered a cyborg prosthetic from amazon that said it was kid size but it was more like adult so I cut it down to size and used sprit gum to adhere it to his face. Then I used Tacky Glue around the edges to seal it and to make it look like torn skin. On his hand I used the tacky glue to outline the opening and then used grey, black and white face paint to create the inside of the hand. I did the same thing on the other side of his face. Then I dabbed fake blood all around the glue.
For the finishing touches I took a pair of 80's style sunglasses and a red finger laser light and attached the laser light to the side of the glasses with sticky back velcro. I found a jacket in his size on amazon and bought a toy shot gun. A little spike of the hair and we were done!
Off he went to trick or treat. All the grown ups knew exactly who he was, his friends had no clue! The best part was he would knock on a door and when someone would open it he would say, " I'm looking for Sara Conner" and then after getting his treat he would say, " I'll be back" It was too funny!
I wonder what he will have me create for him next year? I guess it will all depend on what old movies my husband will be showing him next!
Hope everyone had a fun Hallowen!
Thursday, September 4, 2014
Curiouser and Curiouser
I know who I was when I got up this morning, but I think I must have been changed several times since then. Lewis Carroll.
That is one of my favorite quotes from one of my favorite fairy tales, "Alice and Wonderland". Today I finished my latest art piece called, "Curiouser and Curiouser".
Don't mind my messy table! I normally will take a picture and crop it so that I can create prints but because the wood substrate I used was curved I couldn't get a clean line without cutting off some part of the piece. So I started to play with it in Photoshop. My skills in Photoshop have come a long way but I still have a long way to go. I usually play with the color and contrast but while messing around trying to figure out how to cut out the background while leaving the picture in tact I discovered a happy accident! So after several changes I have created a fun print of "Curiouser and Curiouser".
I think Alice might have been hanging out with the Cheshire Cat! If you like the print it will be available in my Etsy shop. If interested in the original please contact me.
I had a lot of fun creating Alice, thanks for checking out what I have been up to.
That is one of my favorite quotes from one of my favorite fairy tales, "Alice and Wonderland". Today I finished my latest art piece called, "Curiouser and Curiouser".
Don't mind my messy table! I normally will take a picture and crop it so that I can create prints but because the wood substrate I used was curved I couldn't get a clean line without cutting off some part of the piece. So I started to play with it in Photoshop. My skills in Photoshop have come a long way but I still have a long way to go. I usually play with the color and contrast but while messing around trying to figure out how to cut out the background while leaving the picture in tact I discovered a happy accident! So after several changes I have created a fun print of "Curiouser and Curiouser".
I think Alice might have been hanging out with the Cheshire Cat! If you like the print it will be available in my Etsy shop. If interested in the original please contact me.
I had a lot of fun creating Alice, thanks for checking out what I have been up to.
Monday, August 18, 2014
Upcycle Post.... Check it out
The founders of Upcycle Post upcyclepost.com came in to my booth this past weekend. Loved talking to them and what they are doing over there on their website.
Right now its a gallery of upcycled product imagery, but it sounds like there are some big things to come. They took some pictures of my scrabble tiles and one of my OOAK dolls and they are now posted on the site.
If you love to upcycle or buy products from crafters who upcycle this is the place to go.
Check them out! http://www.upcyclepost.com
Sunday, August 17, 2014
Redmond Arts Festival is over but I had so much fun.
I had a blast this weekend at the Redmond Arts Festival. I met so many nice people and I am so happy to see my girls going to new homes! Thank you to everyone that visited my booth this weekend and a special thanks to everyone who purchased a piece of my artwork!
I will be updating my blog as to where I will be next real soon. Hope to see you all again!
xo
I will be updating my blog as to where I will be next real soon. Hope to see you all again!
xo
Friday, July 25, 2014
Game Boy was published.
Exciting news! Game Boy the art doll that Jackson and I created for the Anthropomorphic Doll Challenge was published in the magazine. Even more exciting is that it has it's own page!
Cover
Page 122
Thank you Art Doll Quarterly/Stampington & Company you made Jackson and my day!
Sunday, July 20, 2014
Newest Creepy Cutie Jesse and Chi Chi
I started drawing Jesse and Chi Chi when I was sitting at my booth at Odd Mall at the beginning of June and I have finally finished putting her on a background and adding color.
She was created on a 11 by 14 wood canvas and she has some fun old papers that I have stashed in my studio. Some of the old papers are from my great Aunt. She loved to write recipes on all kinds of papers and what not.
I used acrylics and some stamps and stickers for her background. She is colored in with water color crayons, acrylics and pencils. I used some twinkling H20's on her eyes. Chi Chi was painted with acrylics and water color pencils.
I love how she turned out and while she isn't too creepy, Chi Chi is! I was inspired by an artist that I met at the show Jessica Wilkinson. She makes the most adorable monster pottery!
Prints of Jesse will be for sale along with other Creepy Cuties in my Etsy shop as well as at Redmond Arts Festival August 15th through 17th at Redmond Town Center. Vala will have an art installation at their new arts center and I was one of the artist picked to have a piece represented in the installation. I'm very excited to be a part of this installation.
I finished up one more piece today called, " Sisters". I have been missing my lil sis and so I created this piece thinking of her.
It was a fun productive day in the studio I loved it! Haven't had one of these days in a while.
Hope to be able to spend some more longs days creating again soon!
She was created on a 11 by 14 wood canvas and she has some fun old papers that I have stashed in my studio. Some of the old papers are from my great Aunt. She loved to write recipes on all kinds of papers and what not.
I used acrylics and some stamps and stickers for her background. She is colored in with water color crayons, acrylics and pencils. I used some twinkling H20's on her eyes. Chi Chi was painted with acrylics and water color pencils.
I love how she turned out and while she isn't too creepy, Chi Chi is! I was inspired by an artist that I met at the show Jessica Wilkinson. She makes the most adorable monster pottery!
Prints of Jesse will be for sale along with other Creepy Cuties in my Etsy shop as well as at Redmond Arts Festival August 15th through 17th at Redmond Town Center. Vala will have an art installation at their new arts center and I was one of the artist picked to have a piece represented in the installation. I'm very excited to be a part of this installation.
I finished up one more piece today called, " Sisters". I have been missing my lil sis and so I created this piece thinking of her.
It was a fun productive day in the studio I loved it! Haven't had one of these days in a while.
Hope to be able to spend some more longs days creating again soon!
Jesse and Chi Chi 11 by 14 mixed media on wood canvas
Sisters 14 by 18 mixed media on canvas panel
Unforgettable (will be in artist installation at VALA)
Saturday, May 24, 2014
Inspiration jar.
Most of the time I have tons of ideas going through my head, my brain never stops thinking about what I can create (sometimes too much thinking). Then every once in a while my brain freezes and I get stuck. I know I should really carry a note book around with me so I can write down all my ideas so when I do get stuck I can refer back to the note book. Then again that would require me to remember to bring the note book with me! The other day I was sitting there looking at a blank page very stuck. I couldn't think of one thing. I decided to look up words that describe, people, feelings or moods and write them all out. Words like brave, elegant, compassionate were some for the over 50 words I wrote down. I then cut out the words and put them into a large glass jar. My inspiration jar as I called it was now ready for me to use. All I have to do when I get stuck is reach my hand in and pull out a word to use as a jumping off point.
I used the jar the other night and the word I pulled out was"elegant". Elegant makes me think of a fancy dining room or elegant dress so I decided to create the background with the word elegant in mind.
I first used washi tape, tissue paper with music notes, and dictionary pages to cover my background. Then I used water color crayons in, beige, salmon and yellow to cover the page. Next came a layer of titan buff and titan white rolled on with a roller. After the paint dried I used a tear drop stencil and molding paste to create some texture. When the molding paste dried I used some tan and brown water colors to wash over the tear drops. I then started on the drawing of the girl. I decided I wanted her to have a side profile and a long dress. One of the stencils marks came through on her arm and I thought it looked like a tattoo so I went with it. I choose to color her hair lavender and used neo colors, pencil, pro markers and titan buff to color in her face and body. I used a water color crayon in aqua and twinkling H20's for her eyes along with pencil and pro markers to complete them.
I finished up the piece by adding some stamping with a butterfly stamp and words then used distress inks in Vintage Photo by Tim Holtz for the corners and on the tear drops. I used a rub on of the words, " stand boldly" in small writing next her.
I really like how she turned out and I look forward to my new word that I will jump from.
I used the jar the other night and the word I pulled out was"elegant". Elegant makes me think of a fancy dining room or elegant dress so I decided to create the background with the word elegant in mind.
I first used washi tape, tissue paper with music notes, and dictionary pages to cover my background. Then I used water color crayons in, beige, salmon and yellow to cover the page. Next came a layer of titan buff and titan white rolled on with a roller. After the paint dried I used a tear drop stencil and molding paste to create some texture. When the molding paste dried I used some tan and brown water colors to wash over the tear drops. I then started on the drawing of the girl. I decided I wanted her to have a side profile and a long dress. One of the stencils marks came through on her arm and I thought it looked like a tattoo so I went with it. I choose to color her hair lavender and used neo colors, pencil, pro markers and titan buff to color in her face and body. I used a water color crayon in aqua and twinkling H20's for her eyes along with pencil and pro markers to complete them.
I finished up the piece by adding some stamping with a butterfly stamp and words then used distress inks in Vintage Photo by Tim Holtz for the corners and on the tear drops. I used a rub on of the words, " stand boldly" in small writing next her.
I really like how she turned out and I look forward to my new word that I will jump from.
She stands boldly in her elegant world.
Fairyland Zine
This year along with life Book I have been taking another year long online class Called, "The Year of the Fairytale" created and taught by Carla Sonheim. www.carlasonheim.com. Carla is the author of The art of Silliness and the Drawing Lab. She lives here in the Seattle area too. Although I haven't really had much time to do all the work from the class I have enjoyed her lesson and discovering old and new to me fairytales. Plus I have learned a few new technics to play around with.
Recently we did a lesson on the Princess and the Pea and Carla asked all of us to participate in creating a zine. We had to think of something other than the pea to put under the bed and so I created Princess and the Dragon. In my illustration the princess doesn't know what she is going to do with all these dragons. My illustration is on page 71. It was fun to create this little piece and I love seeing other classmates illustrations too. Click the link below to be taken to the zine. Hope you enjoy!
Wednesday, March 12, 2014
Game Boy an Anthropomorphic Doll
Recently my son Jackson and I created an art doll for a challenge in Art Doll Quarterly Magazine. The challenge was to create an Anthropomorphic Doll.
From dictionary.com
an·thro·po·mor·phic
/ˌæn
θrə
pəˈmɔr
fɪk/ Show Spelled [an-thruh-puh-mawr-fik] Show IPA
adjective
1.
ascribing human form or attributes to a being or thing not human, especially to a deity.
2.
resembling or made to resemble a human form: an anthropomorphic carving.
Also, an·thro·po·mor·phous.
While sitting on the couch thinking of the meaning of this word and how to pronounce it correctly my youngest son Jackson asked what I was trying to say and what did it mean. We sat there for a few minutes thinking of things that would be cool to make when my older teenage son came flying down the stairs, through open the fridge grabbed a drink and ran back up stairs to get back on his computer where he was playing an online game with his friends. Jackson said, " If we were going to make a doll like that of Matthew he would be half computer"! We both started cracking up and that was when we decided to create Game Boy.
Game boy is 5 inches tall and his hands were created as Wii remotes. Game Boy is made out of paper clay with a tin foil armature. I haven't made too many dolls before but I couldn't pass up the opportunity to create something with my kid.
Game Boy's monitor/head was created using Yupo paper http://yupousa.com/what-is-yupo/ and liquid FX Inks and Dylusions Spray inks. I dripped and sprayed the inks onto the Yupo paper and Jackson with a straw blew the inks all around the paper. Then we cut out a piece of it to fit inside of the monitor/head. We then used a thin piece of plastic and glued it on the front to create the outer portion of the monitor. Game Boy was painted in acrylics and sealed with a glossy varnish.
.
Game Boy was sent of this week to ADQ and I got an email that he arrived but one of his legs broke during shipping :(. Note to self: Use foil through the legs as well to help strengthen them. ADQ offered to glue the leg back on and said it was still in consideration for the challenge. I thought this was so kind of ADQ to let me know what happened and to offer to glue it! Jackson and I are so excited to have this entered into the challenge and we had a blast making him. We are crossing our fingers that we will see him in the fall addition of ADQ. Wish us luck!
P.S. When we were finished making Game Boy we took him up stairs to show Matthew what we created inspired by him and he looked up from his computer smiled and said, "Cool".
LOL, I think Game Boy represents many teenage boys now a days!
P.S.P.S Anyone a fan of Shel Silverstein? I am and Game Boy reminds me of one of my favorite poems from his book, "Where the side walk ends". Does anyone remember, "Jimmy Jet and his TV set"? http://www.turnoffyourtv.com/poemsessays/jimmyjet.html
Baby's got a new hat.
I have been spending some time creating different looks for baby and I just finished up Baby with her 10 gallon cowboy hat.
I used the same process as I did with the first baby. I did try creating my own rub on's using Grafix Rub Onz for ink jets and Graphics Fairy's free designs http://thegraphicsfairy.com . http://www.amazon.com/Grafix-Rub-Onz-Inkjet-2-Inch-11-Inch/dp/B000WZKCRY/ref=sr_1_1?ie=UTF8&qid=1394662773&sr=8-1&keywords=create+your+own+rub+ons
I loved creating my own rub on's but I will say using the Grafix product wasn't as easy as I hoped. I will give it a few more try's before I decide if I like it or not. So far it seems way easier to buy them.
Here is baby with her cowboy hat. Hope you like her. I will have prints available of her in my Etsy shop real soon.
I used the same process as I did with the first baby. I did try creating my own rub on's using Grafix Rub Onz for ink jets and Graphics Fairy's free designs http://thegraphicsfairy.com . http://www.amazon.com/Grafix-Rub-Onz-Inkjet-2-Inch-11-Inch/dp/B000WZKCRY/ref=sr_1_1?ie=UTF8&qid=1394662773&sr=8-1&keywords=create+your+own+rub+ons
I loved creating my own rub on's but I will say using the Grafix product wasn't as easy as I hoped. I will give it a few more try's before I decide if I like it or not. So far it seems way easier to buy them.
Here is baby with her cowboy hat. Hope you like her. I will have prints available of her in my Etsy shop real soon.
Subscribe to:
Posts (Atom)